Melon Pan: Japanese Sweet Bun with Crisp Biscuit Crust

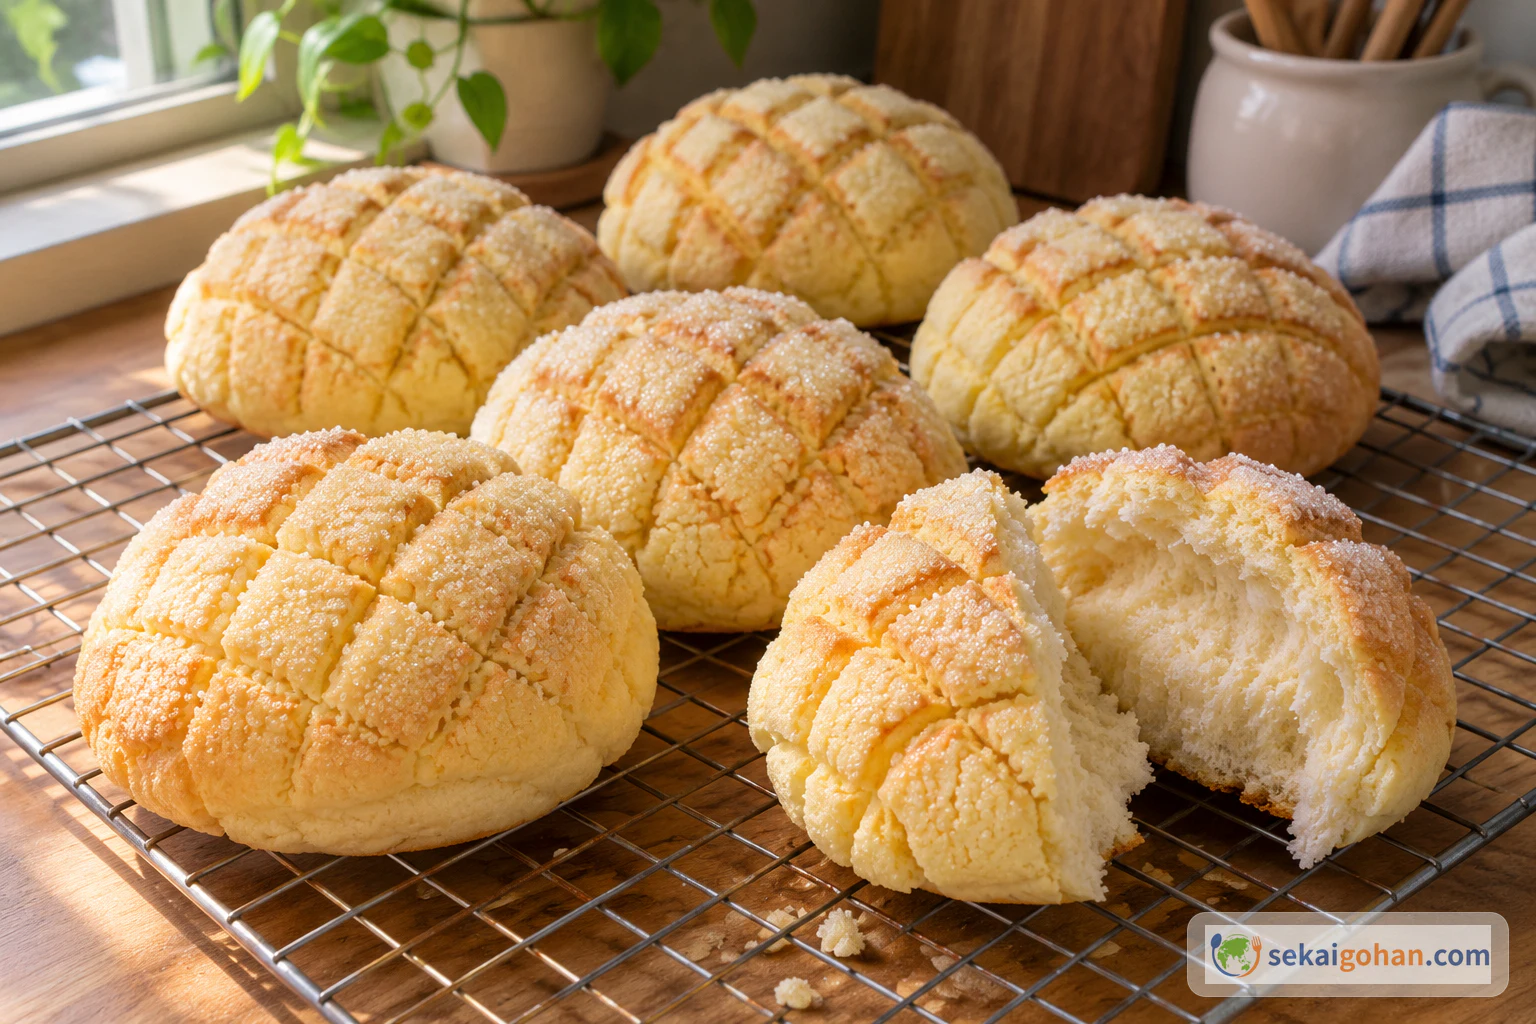
Grid-patterned melon pan cooling on a wire rack, sugar glittering on top and pale golden color showing through the cracks in the biscuit crust
Serves
10 buns
Level
Intermediate
Cuisine
Japanese

Melon pan is Japan's soft bun under a crisp sugared biscuit crust. Wrap the dough, score a shallow grid, bake to pale gold, and meet Kobe's sunrise.

Cooking flow

Cooking steps

STEP 11 / 10

Mix the bread dough

STEP 1

In a large bowl, combine the bread flour, cake flour, salt and sugar. Add the yeast, beaten egg, milk and water. Stir for about 2 minutes until there is no loose flour and the dough looks shaggy and sticky. Turn it out onto the counter and knead for about 5 minutes, until it starts to pull together into one smoother mass.

STEP 22 / 10

Knead in the butter until a windowpane forms

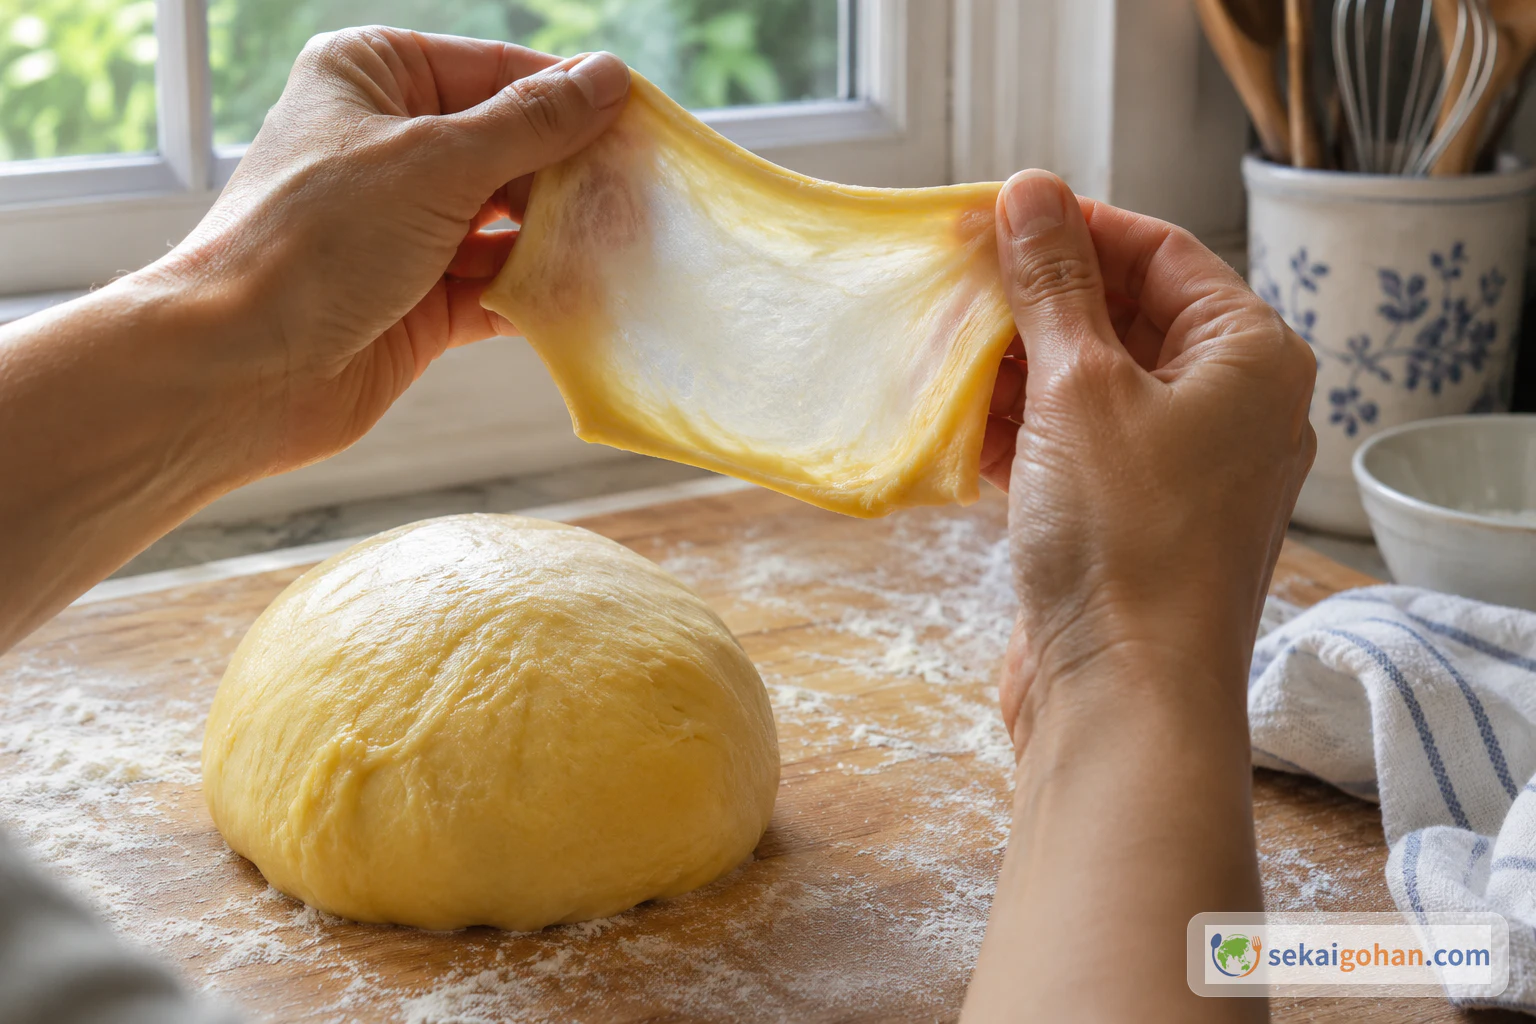
Stretching kneaded dough until a membrane thin enough to see light through forms
A ready dough stretches into an even, translucent sheet. Ragged holes mean it needs more kneading

Press the cubed butter into the dough and knead it in. The dough will turn slippery and messy at first. Keep kneading by hand for about 10 more minutes, until the butter disappears and the surface is smooth and glossy. Pinch off a small piece and stretch it between your fingers. It is ready when it stretches thin enough for light to show through. If it tears, knead 2 minutes more and test again.

Trust the windowpane

The windowpane test decides how soft the bread will be. Keep testing until the dough stretches thin without tearing.

STEP 33 / 10

Let it rise until doubled

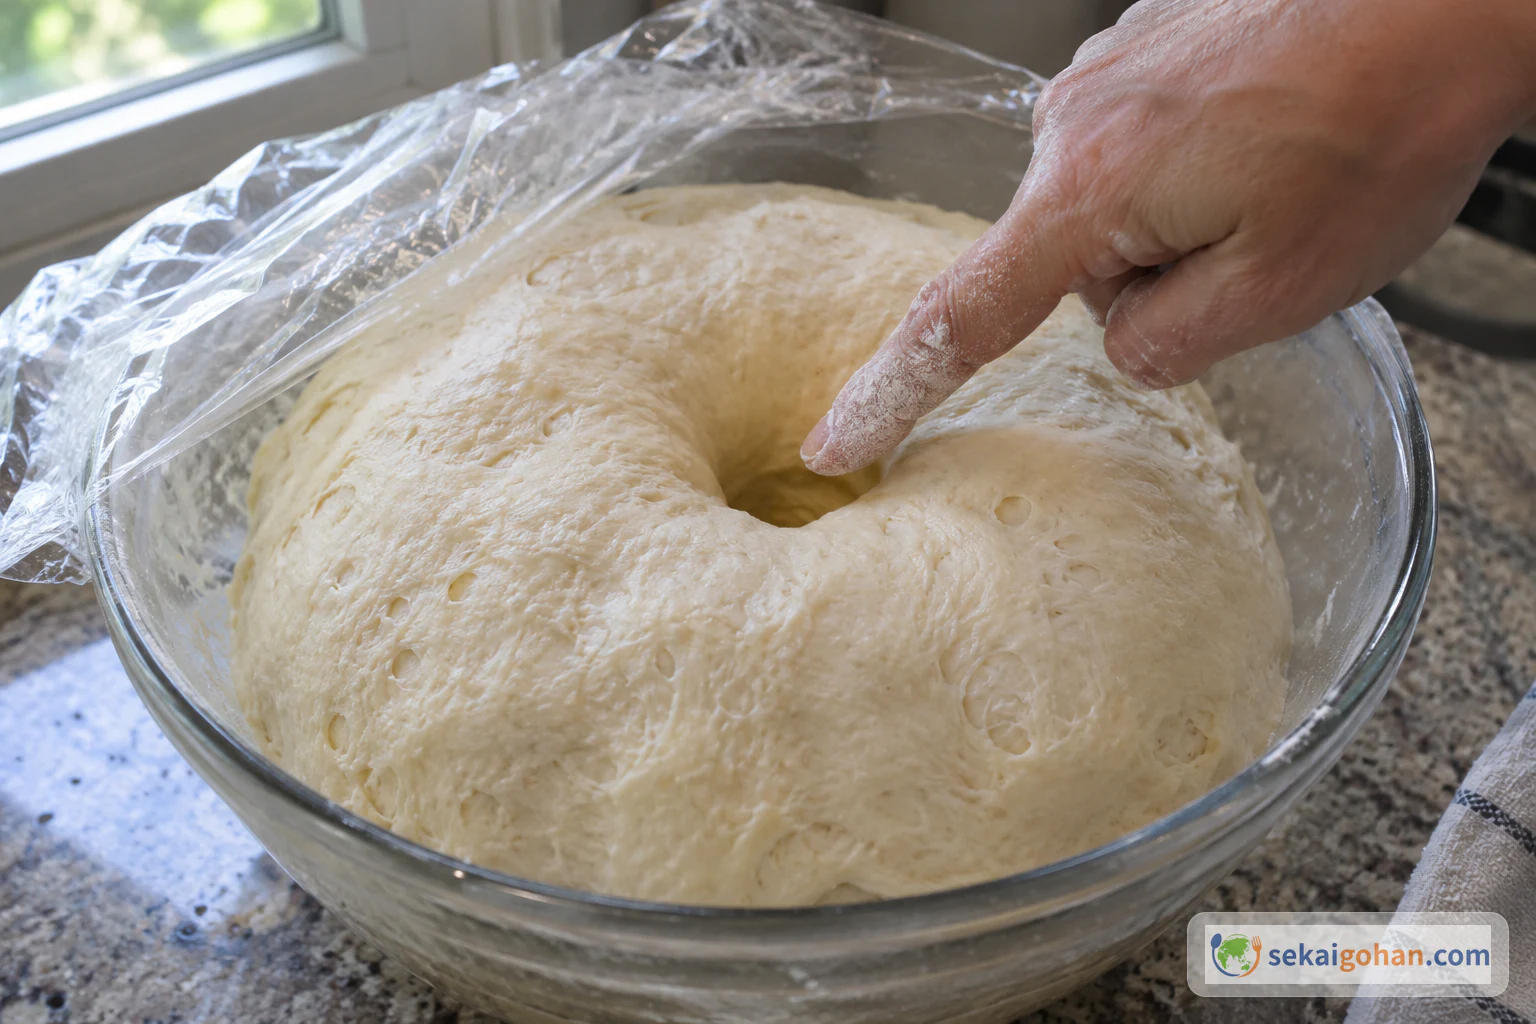
Pressing a finger into bread dough that has doubled in the bowl to check that the hole stays
The finger hole should stay put. If it fills back in quickly, give the dough more time

Shape the dough into a smooth ball and set it seam side down in a bowl. Cover it and leave it in a warm place for 1 to 2 hours, until it has roughly doubled. If your oven has a proof setting, 100°F (38°C) works well. To test it, press a floured finger deep into the center. The dough is ready when the hole stays open and does not spring back.

STEP 44 / 10

Make and portion the biscuit crust

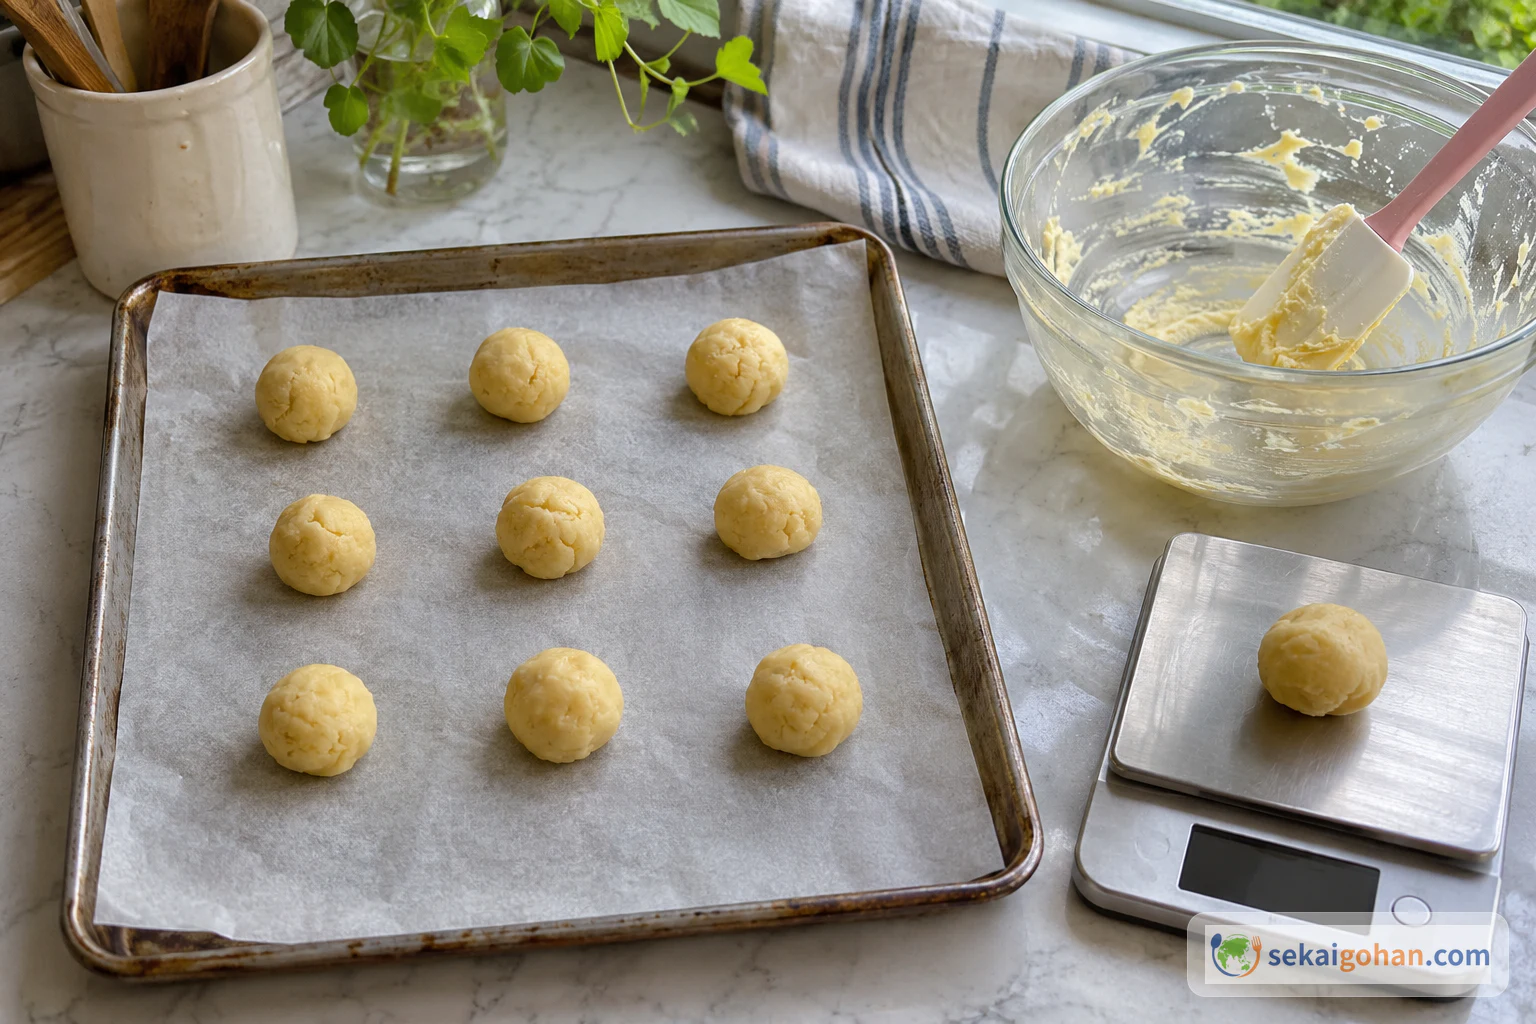
Biscuit dough divided into 10 equal portions on a tray, with the last portion on the scale
Weigh every portion. Even crusts mean even buns on the tray

While the dough rises, beat the soft butter in a bowl until smooth, then mix in the sugar. Add the beaten egg a little at a time, mixing well after each addition so the mixture stays smooth. Sift in the cake flour and baking powder and mix just until no dry flour remains, then gather it into a ball. It weighs about 14 oz (400–410 g). Divide it into 10 equal pieces of 40–41 g each, set them on a tray and chill for about 10 minutes.

STEP 55 / 10

Divide the bread dough and rest it

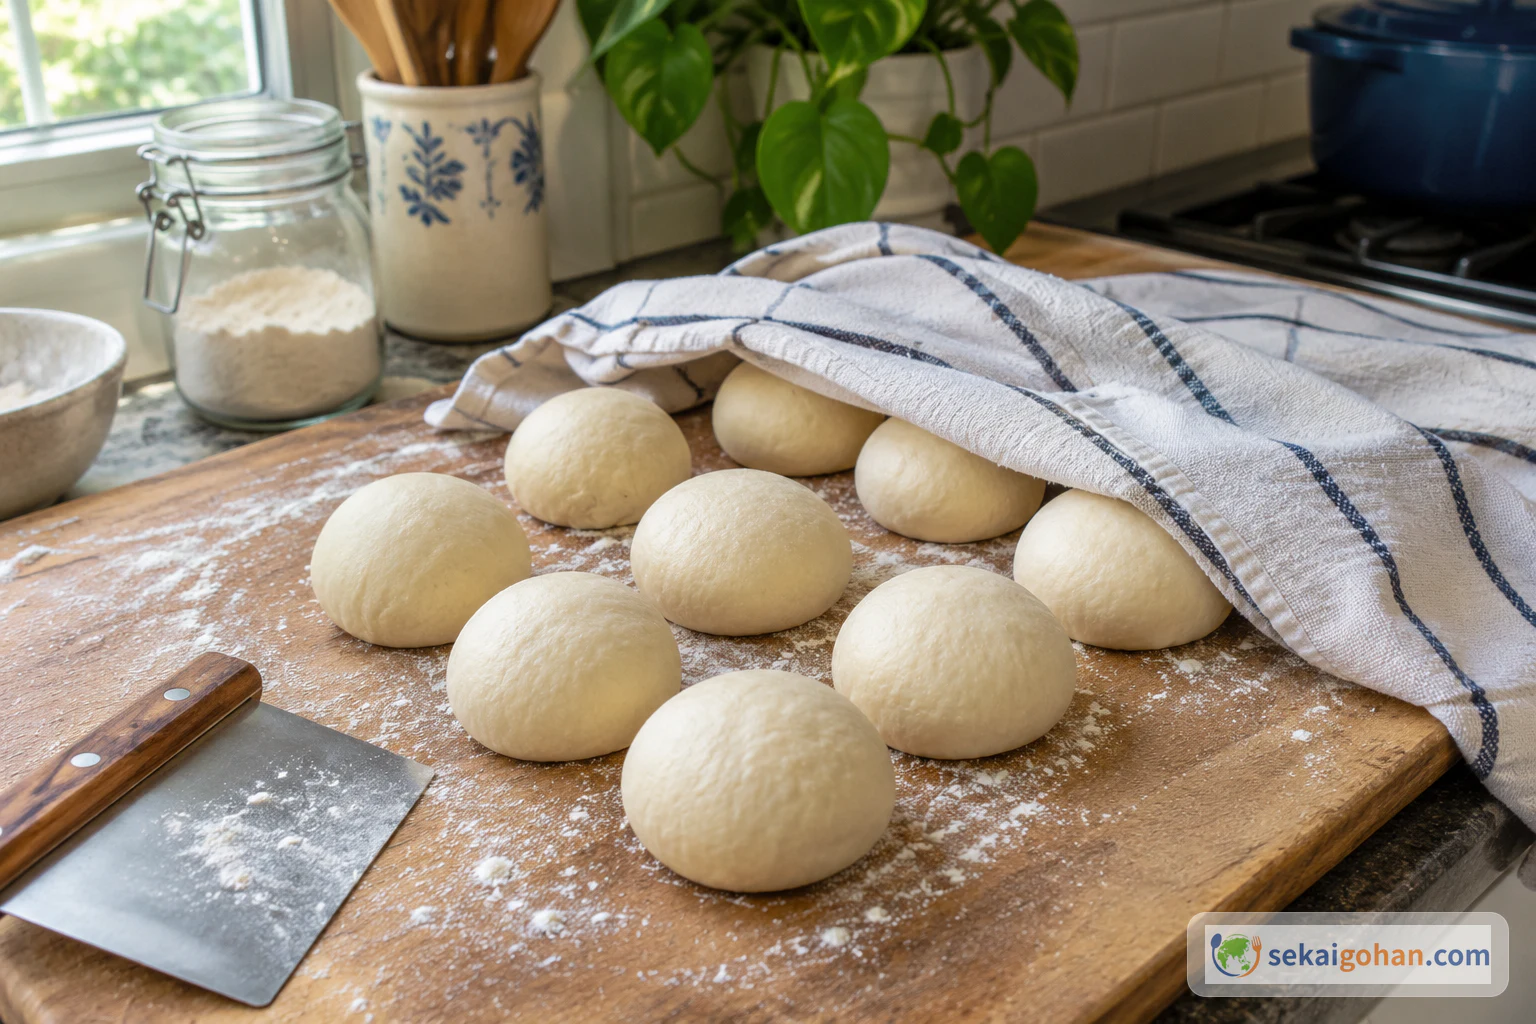
Bread dough divided into 10, rolled into balls and covered with a cloth to rest
Keep the balls covered while they rest so the surface stays supple, not crusted

Punch down the risen dough to release the gas and weigh it, about 1 lb (460–470 g). Cut it into 10 equal pieces of 46–47 g each and roll each one into a tight ball. Cover the balls with a cloth and leave them at room temperature for 15 minutes.

STEP 66 / 10

Roll out the crusts

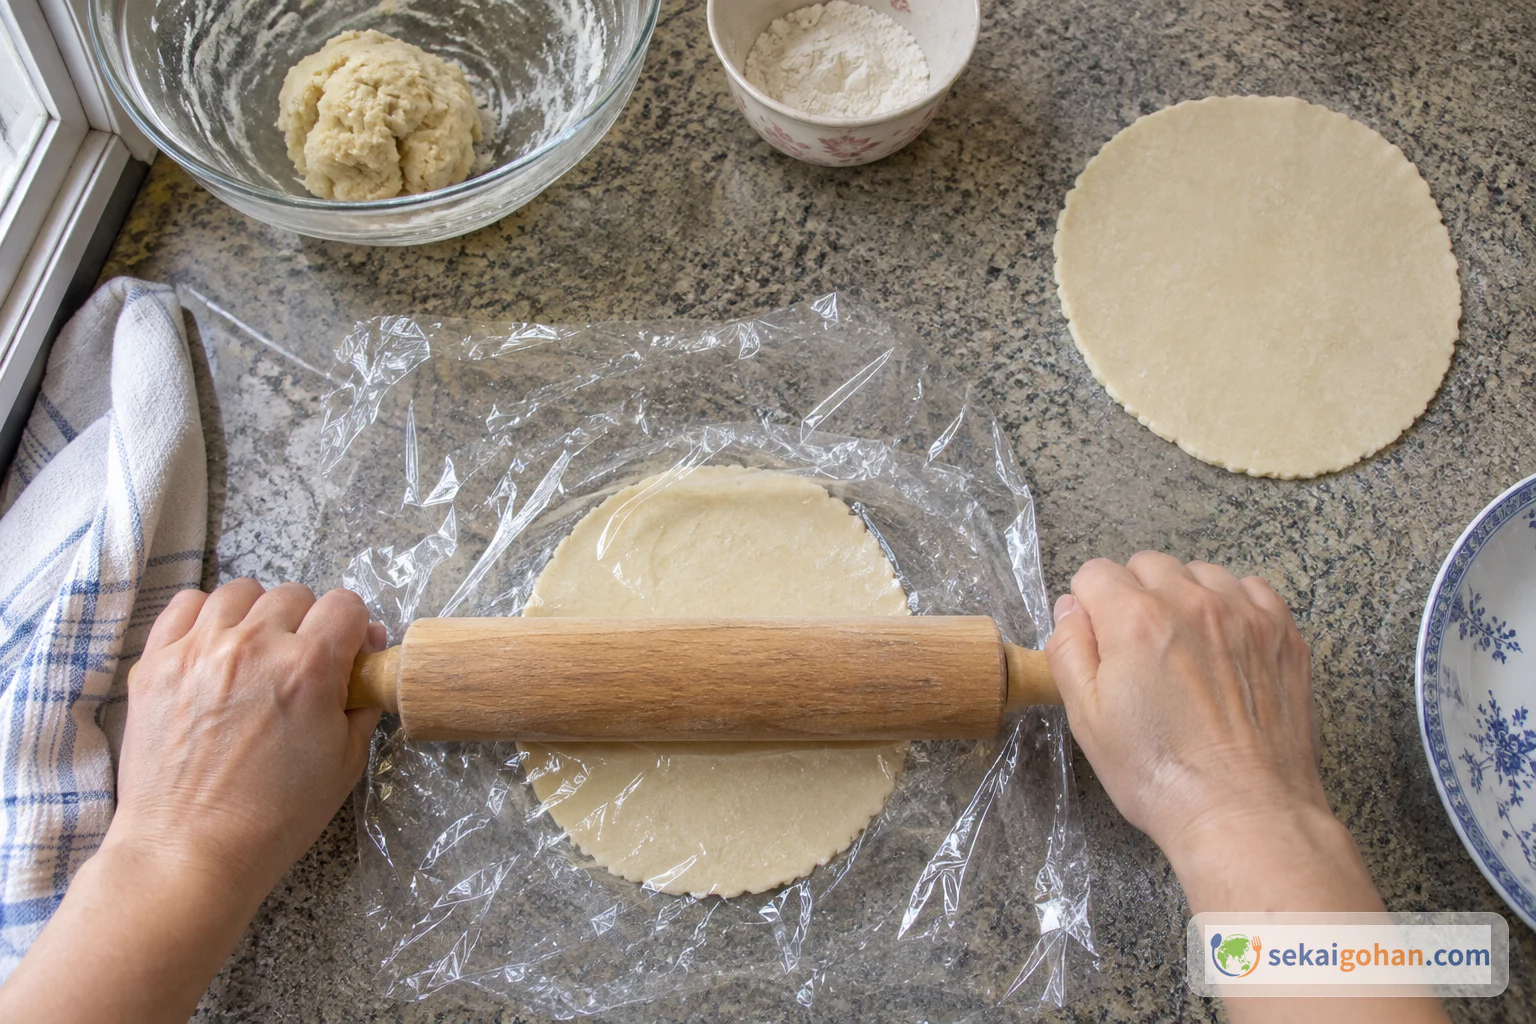
Rolling biscuit dough between plastic wrap into a 10–12 cm round
Turn the wrapped round a quarter turn between passes to keep it circular

Take the biscuit portions from the fridge one at a time. Flatten one, set it between two sheets of plastic wrap and roll it into a round 4 to 4¾ inches (10–12 cm) across. The wrap stops it from sticking to the pin and makes it easy to lift. The round is done when it is even in thickness all the way to the edge, with no cracks around the rim.

STEP 77 / 10

Wrap the bread in the crust

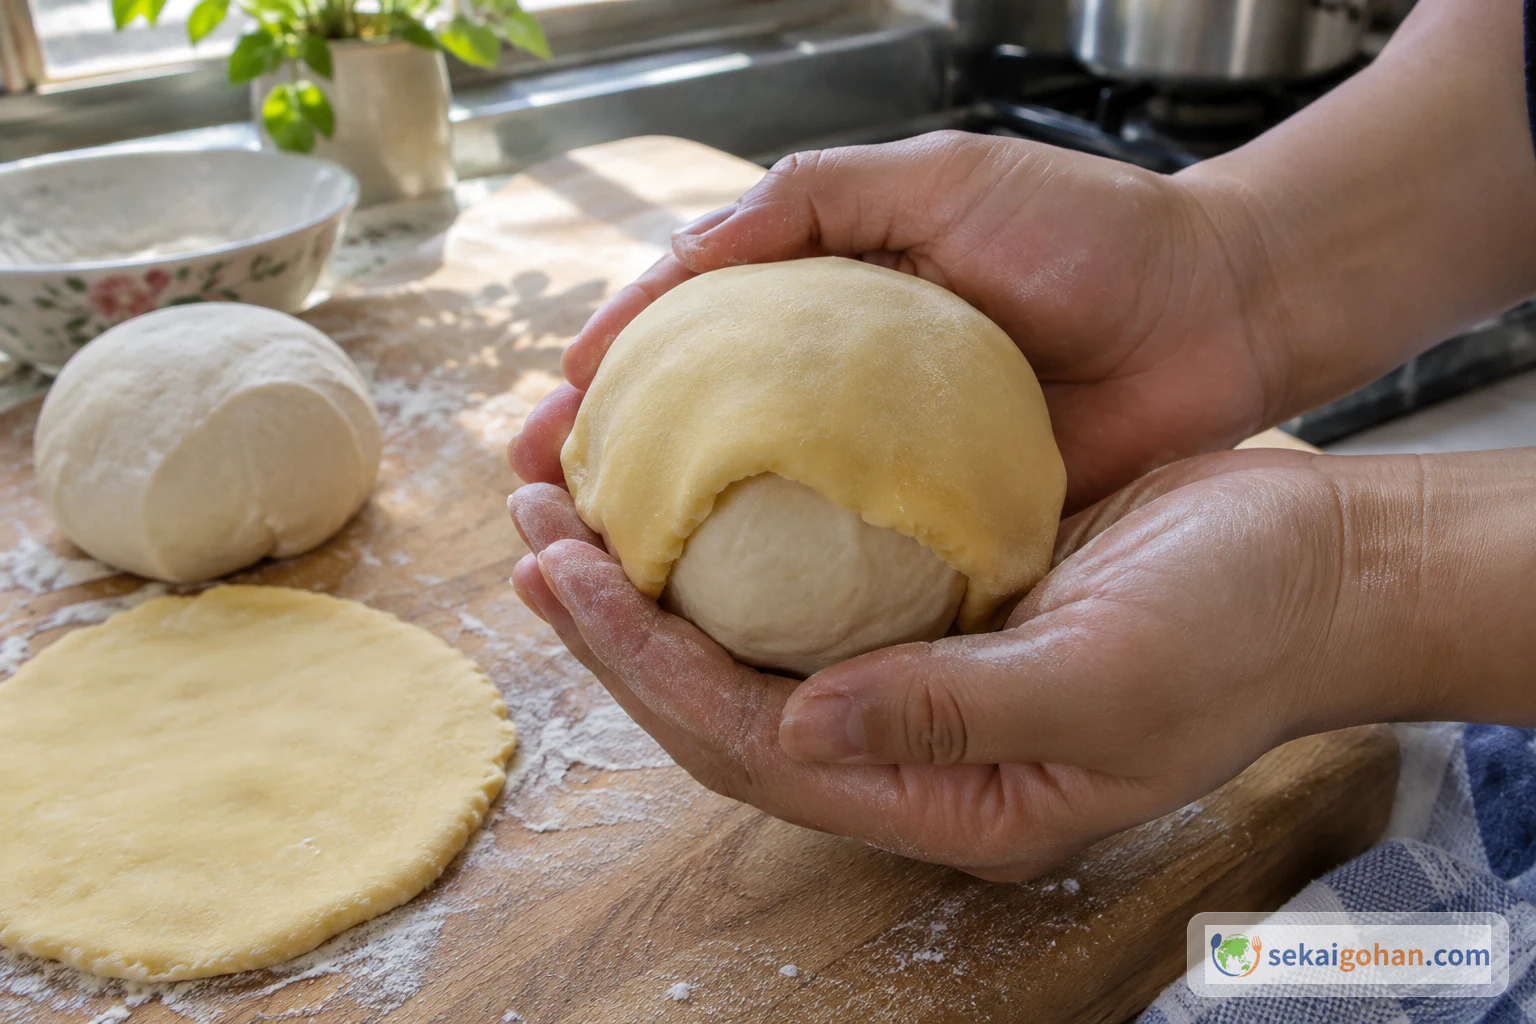
Bread dough set on the biscuit crust, flipped, and wrapped down the sides with the bottom of the bread left showing
Cup the bun in your palm as you wrap. The bread at the base stays exposed

Flatten a ball of bread dough, fold it over on itself and roll it back into a taut round with a firm seam. Lay it seam side up on a crust round, then flip the pair over and ease the crust over the top and down the sides. Leave the bottom of the bread uncovered. The bun is wrapped when the crust hugs the dome smoothly with no gaps at the shoulders.

STEP 88 / 10

Sugar the tops and score the grid

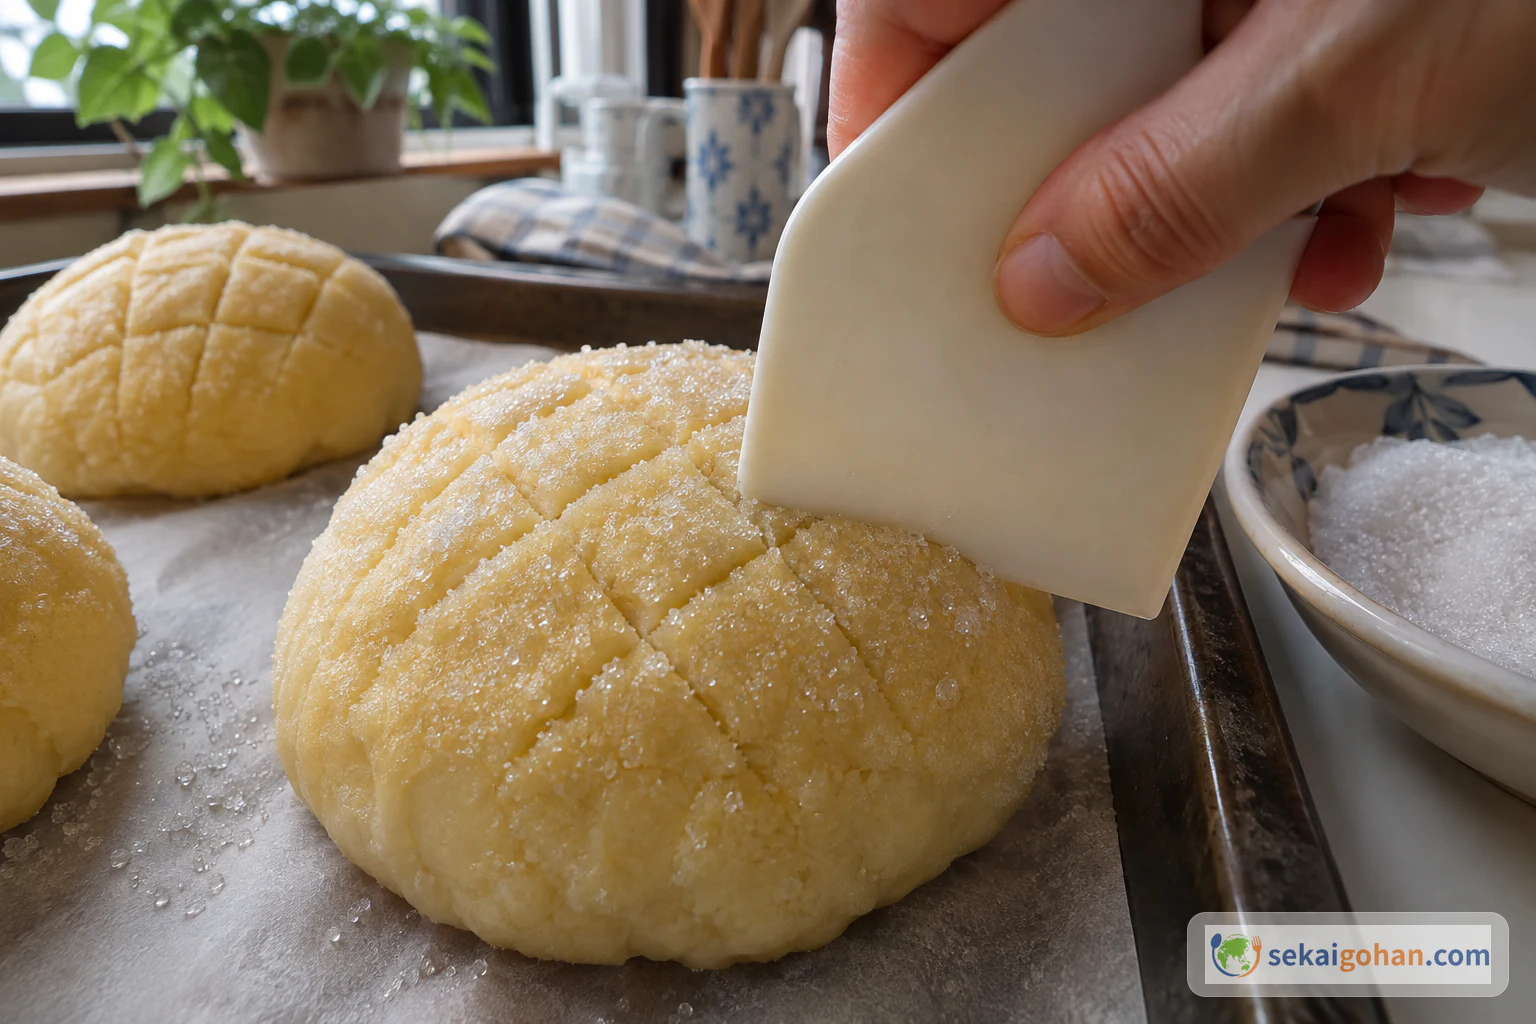
Pressing the biscuit side into granulated sugar and scoring a diagonal grid about 3 mm deep with a bench scraper
Press the scraper straight down rather than dragging it, so the sugar stays put and the lines stay crisp

Press the crust side of each bun into the granulated sugar so the whole top is coated. With a bench scraper or a grid stamp, score a crisscross grid about ⅛ inch (3 mm) deep. Space the lines evenly in both directions. Set each bun on the lined baking sheet. The scoring is right when the lines are clear and even but have not cut through to the bread.

Shallow, even lines

The grid is what makes the crust crack neatly. Shallow, evenly spaced cuts let the surface split evenly as the bun rises, so it bakes into a tidy round. Cuts that are too deep tear open in the oven. Cuts that are too faint fill in and vanish.

STEP 99 / 10

Proof until 1½ times the size

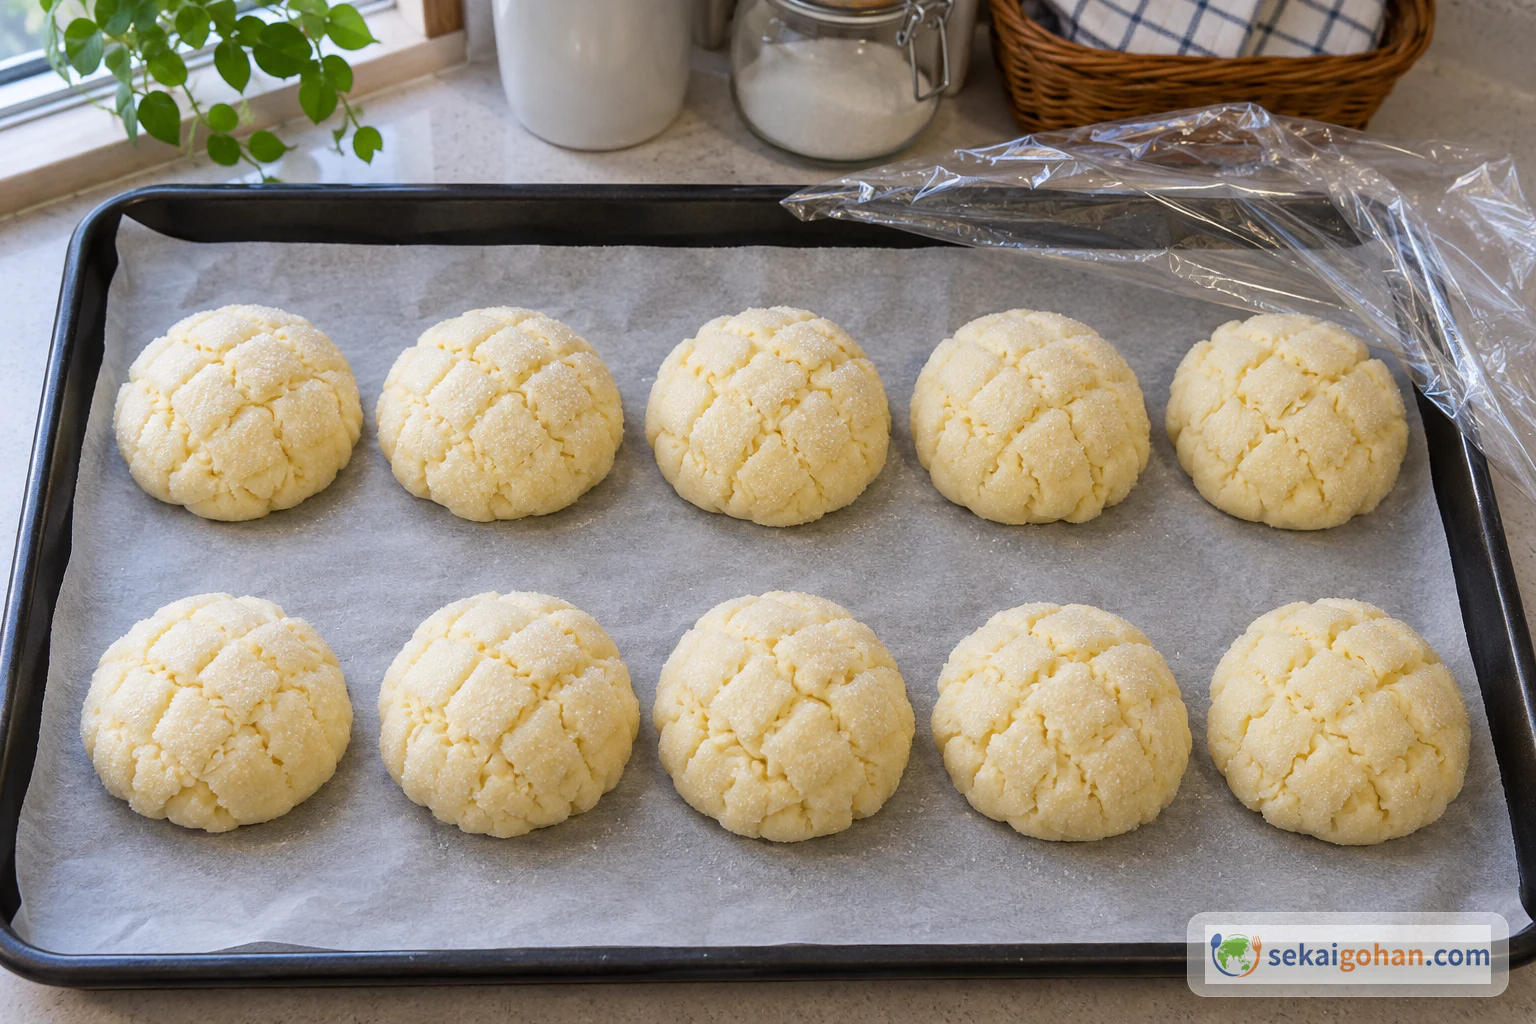
Melon pan buns on the baking sheet after the final proof, puffed up with fine cracks starting between the grid lines
Leave generous space between the buns. They spread a little more in the oven

Cover the buns loosely so the crust does not dry out, and leave them in a warm place, or in the oven at 100°F (38°C), for about 50 minutes. When they are about halfway there, take them out of the oven if they are proofing inside it, and preheat it to 350°F (180°C). They are ready when they have grown to about 1½ times their size and fine cracks are starting to open between the grid lines.

STEP 1010 / 10

Bake to pale gold and cool

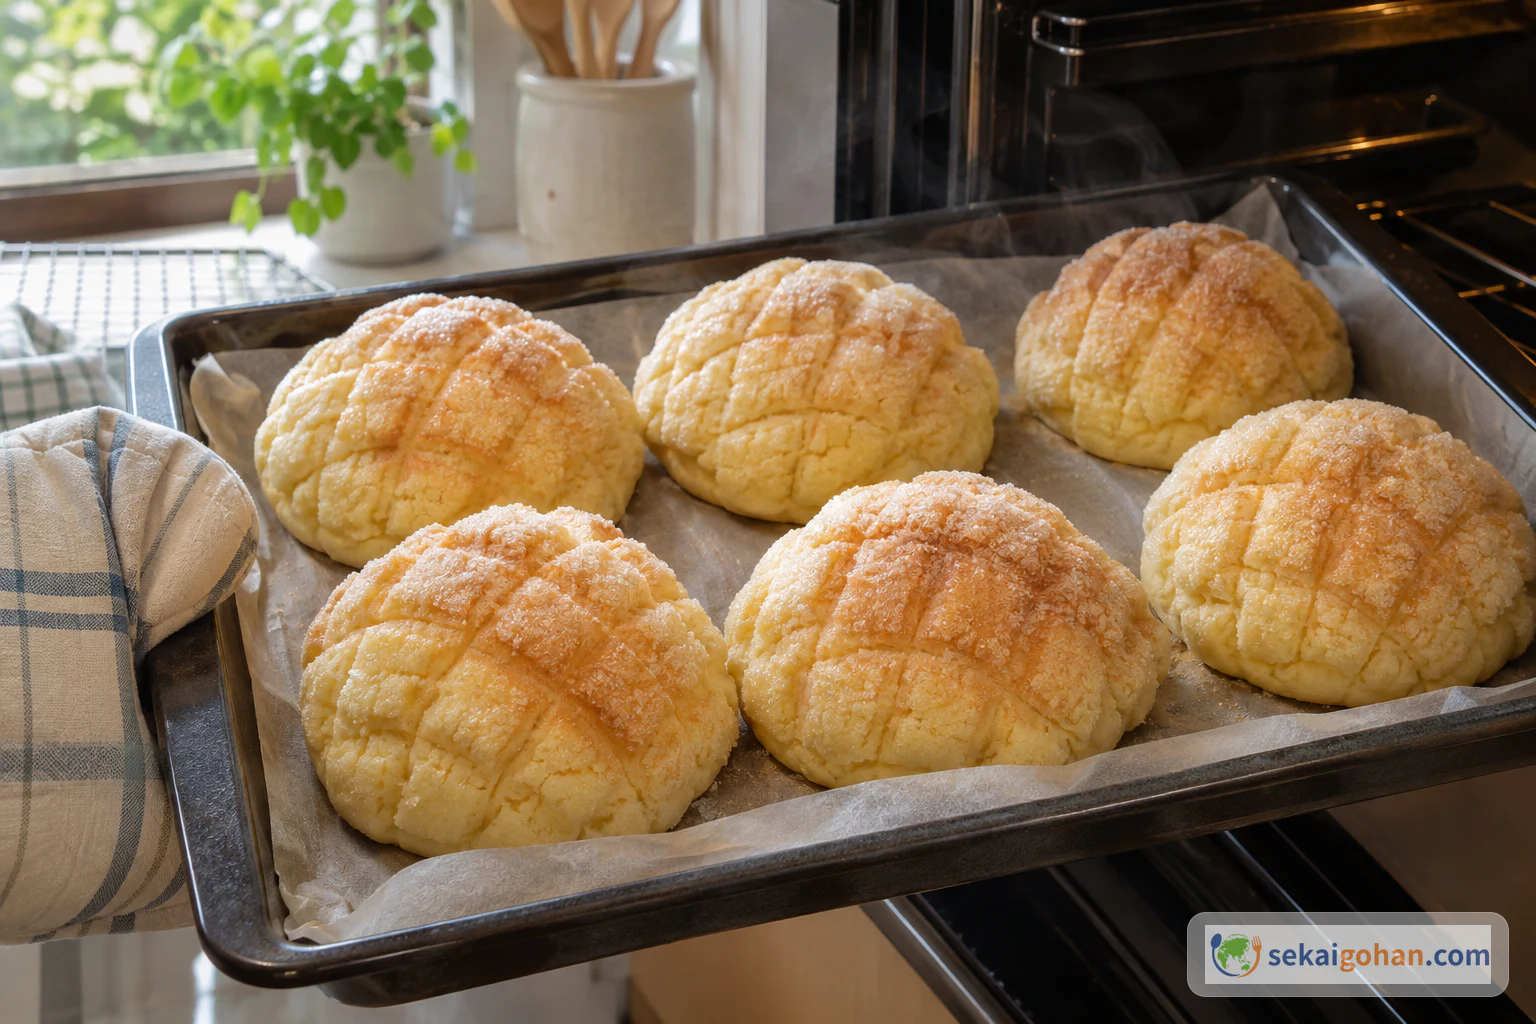
Taking melon pan baked to pale gold out of the oven
Pull the tray when the crust is pale gold

Bake on the middle rack at 350°F (180°C) for 13 to 15 minutes, until the crust is a pale golden color. If one side colors faster, turn the tray halfway through. Do not let them go darker, because an overbaked crust turns hard rather than crisp. Move the buns to a wire rack and let them cool for about 5 minutes.

Stop at pale gold

The color of the crust tells you when the buns are done. Ovens run differently, so watch from the 13-minute mark. A light golden crust stays crisp and short, while a deep brown one bakes hard and loses the contrast with the soft bread inside.

0 / 0
Ingredients

Ingredients

1 / 3

Bread dough

Ingredient Amount Role
Bread flour, plus extra for dusting 8 oz (225 g) Structure and spring
Cake flour scant 1 oz (25 g) A lighter, softer bite
Kosher salt (Diamond Crystal) 1 tsp (½ tsp if using table salt) Seasoning and steadies the rise
Granulated sugar 3 tbsp Sweetness and color
Instant yeast 1¼ tsp Rise
Large egg, beaten 1 (1¾ oz / 50 g out of the shell) Richness and color
Whole milk, at 86°F (30°C) 3 tbsp + 1 tsp (50 ml) Moist, tender crumb
Water, at 86°F (30°C) 3 tbsp + 1 tsp (50 ml) Hydration
Unsalted butter, cubed, room temperature 1¼ oz (35 g) Soft, fluffy texture
2 / 3

Biscuit crust

Ingredient Amount Role
Unsalted butter, cubed, room temperature 2 oz (60 g) Crisp, short crust
Granulated sugar 3½ oz (100 g) Sweetness and the crackled surface
Large egg, beaten 1 (1¾ oz / 50 g out of the shell) Binds the crust
Cake flour, sifted 7 oz (200 g) Body of the crust
Baking powder ½ tsp Lightness
3 / 3

Topping

Ingredient Amount Role
Granulated sugar 2 tbsp Sparkle and crunch on top; you will have some left over
0 / 0

When the tray comes out of the oven, the tops are pale gold. Sugar catches the light along a diamond grid, and fine cracks have opened between the lines. Give the buns five minutes on the rack, then break one open. A thin, crisp, sugary shell gives way to soft white bread. That pairing is melon pan: a sweet, cookie-like crust baked over an enriched bun. Across Japan, people know the round, grid-scored bun by that name. In Kobe the same bun is called sunrise, and "melon pan" means a different bread altogether.

A Bun with Two Names: Melon, Sunrise and the Kobe Twist
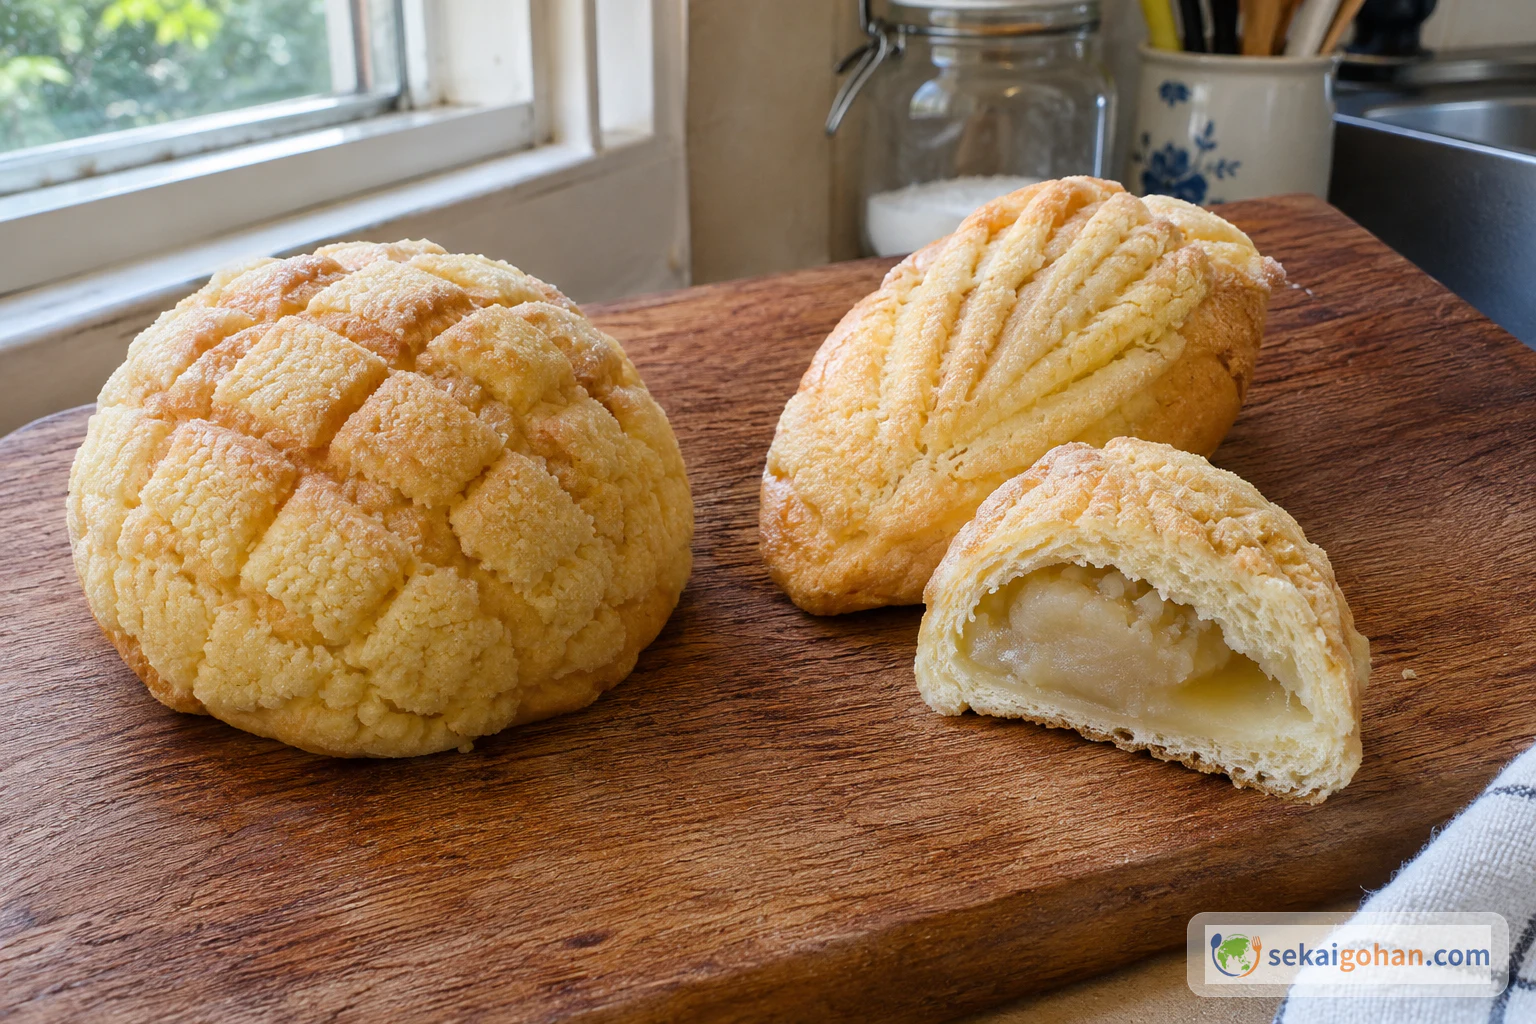
A round grid-patterned melon pan beside an almond-shaped bun with radiating lines and a white bean paste filling
Left, the round bun most of Japan calls melon pan. Right, the almond-shaped white-bean bun that takes the name in parts of Kansai and Hiroshima

Where the name comes from

Where the name melon pan began is not settled. The most common explanation is the look of the bun: a domed, scored crust that resembles the skin of a melon. Another idea is that melon essence once flavored the crust. A third traces "melon" to meringue, as if the bun started life as meringue bread and the word wore down over time. The last explanation runs through an older bun filled with white bean paste and shaped like a makuwa, the small Asian melon. The name may have passed from that bun to the round one. All four stories are still in circulation, and none of them has won.

Sunrise, from a naval port to Kobe

In Kobe, the round, grid-topped bun is sunrise. The name is linked to Kinseido, a bakery founded in 1924 in the Higashiyama market in Hyogo ward. The bakery's story is that before the war, an uncle who ran its branch in Kure, the naval port in Hiroshima, created the bun and modeled its scored top on the rising-sun flag flown by warships. The story has never been confirmed, but the name spread outward from Kobe across Kansai. A Kobe sunrise and a round melon pan from anywhere else in the country have the same shape, taste and texture. Only the name differs.

Sunrise or "Sunrice"

Kinseido, the bakery credited with the name, spells it Sunrice (サンライス) on its own labels, with an "s" sound where the rest of Kobe says sunrise. In Mihara and Kure in Hiroshima, the round bun is reportedly called koppepan, a name used there for the round bun.

The other melon pan

In Kobe and parts of Kansai and Hiroshima, ask for melon pan and you may be handed an almond-shaped bun filled with white bean paste, its top marked with radiating lines instead of a grid. Kobe's version is said to have been created in 1952 by a baker at what is now Co-op Kobe. Its oval outline may echo the makuwa melon, which ties it back to one of the naming stories. The recipe below is the round, grid-scored bun, the one the whole country recognizes, whatever it is called at the local bakery.


Ingredients (makes 10 buns)
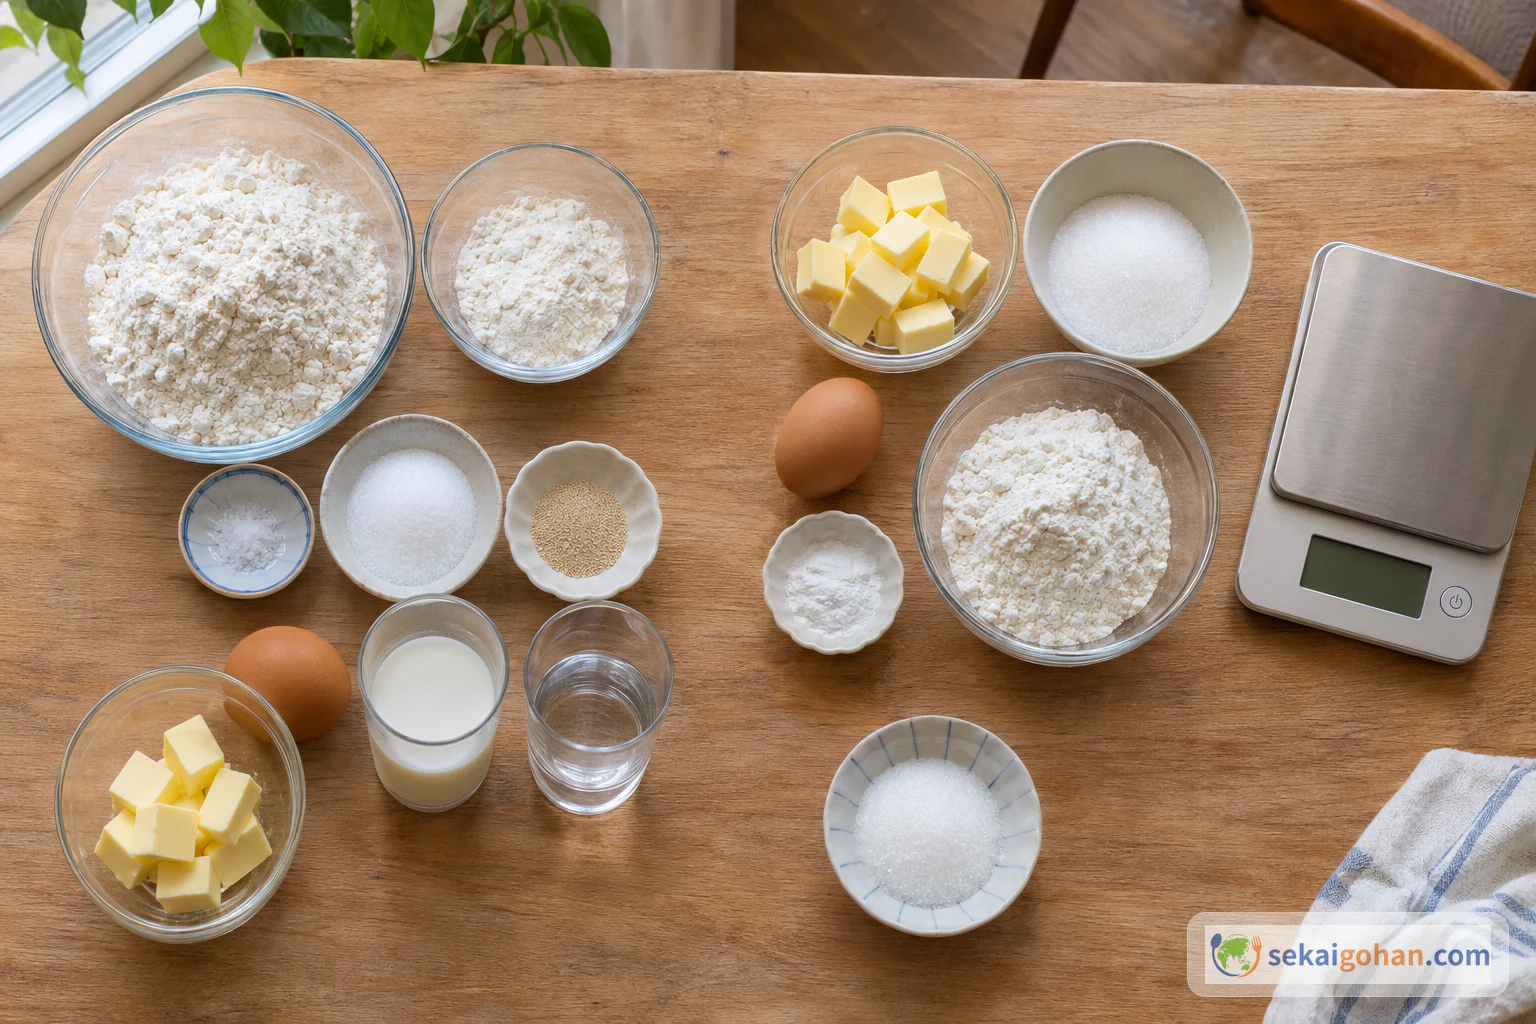
Ingredients for the bread dough and biscuit dough: bread flour, cake flour, salt, sugar, instant yeast, two eggs, milk, water, unsalted butter, baking powder and granulated sugar for the topping
Two eggs, two portions of butter and three portions of sugar: set them out in separate groups before you start

This dough uses eggs, butter and sugar in more than one place. One egg goes into the bread and one into the crust. The butter is split into a small amount for the bread and a larger amount for the crust. Sugar goes into the bread, the crust and the coating on top. Weigh everything into separate groups first so nothing ends up in the wrong bowl.

Allergen information

This recipe contains wheat, egg and milk. The biscuit dough contains raw egg, so do not taste it before baking.

Equipment

  • Digital kitchen scale that reads in 1 g steps (for dividing both doughs into 10)
  • Mixing bowls and a sieve
  • Rolling pin and plastic wrap
  • Bench scraper
  • Melon pan grid stamp (optional)
  • Baking sheet lined with parchment paper
  • Wire cooling rack
  • Oven

Choosing and Substituting

Every ingredient is sold in an ordinary supermarket, so nothing has to come from a specialty shop. What matters is getting each item close to what the dough expects. The crust is what makes the bun taste right. Keep it made from cake flour, butter, granulated sugar and egg, and let it go no darker than pale gold. The bread underneath is more forgiving.

Item What to use What changes if you swap
Salt Diamond Crystal kosher salt Table salt is denser, so use half the amount
Yeast Instant yeast, mixed straight into the flour Active dry yeast works if you first dissolve it in the milk warmed to about 110°F (43°C)
Eggs Weigh to 50 g each, beaten Medium eggs are fine if you top them up to 50 g
Butter Unsalted Salted butter makes both the crust and the bread saltier
Sugar Granulated Japanese soft white sugar (jōhakutō) browns faster, so the crust darkens sooner
Baking powder Any baking powder Aluminum-free baking powder is fine too
Soften the butter properly

For the crust, the butter is ready when a fingertip leaves a dent easily. If it is too hard, it will not cream with the sugar. If it is melting, the egg will split it and the crust will spread instead of holding its grid.


Method

The bread dough comes first, because its rise is the longest stretch of hands-off time. Make the biscuit crust while the dough rises, then divide, wrap, score and proof the buns, and bake them in a single batch. Read the dough at each stage by doubling for the first rise and about 1½ times for the second, not by the clock alone.

When It Goes Wrong

What you see Why What to do
The crust sticks to everything and will not roll The biscuit dough is too warm Do not skip the 10-minute chill. Roll it between plastic wrap and return it to the fridge briefly if it softens again
The crust cracks around the edge as you roll It was chilled too long and is too firm Leave it at room temperature for a few minutes until it bends without breaking
The grid fills in or the top splits open wide The cuts were too shallow or too deep, or the crust dried out during proofing Score to about ⅛ inch (3 mm) and keep the buns covered during the final proof
The crust is dark and hard Baked past pale gold, or one side of the oven runs hot Start checking at 13 minutes and turn the tray if one side colors first
The buns are small and dense, or puffed and collapsing The dough was under- or over-proofed Judge the first rise by doubling and the finger test, not by the clock

Serving and Storing

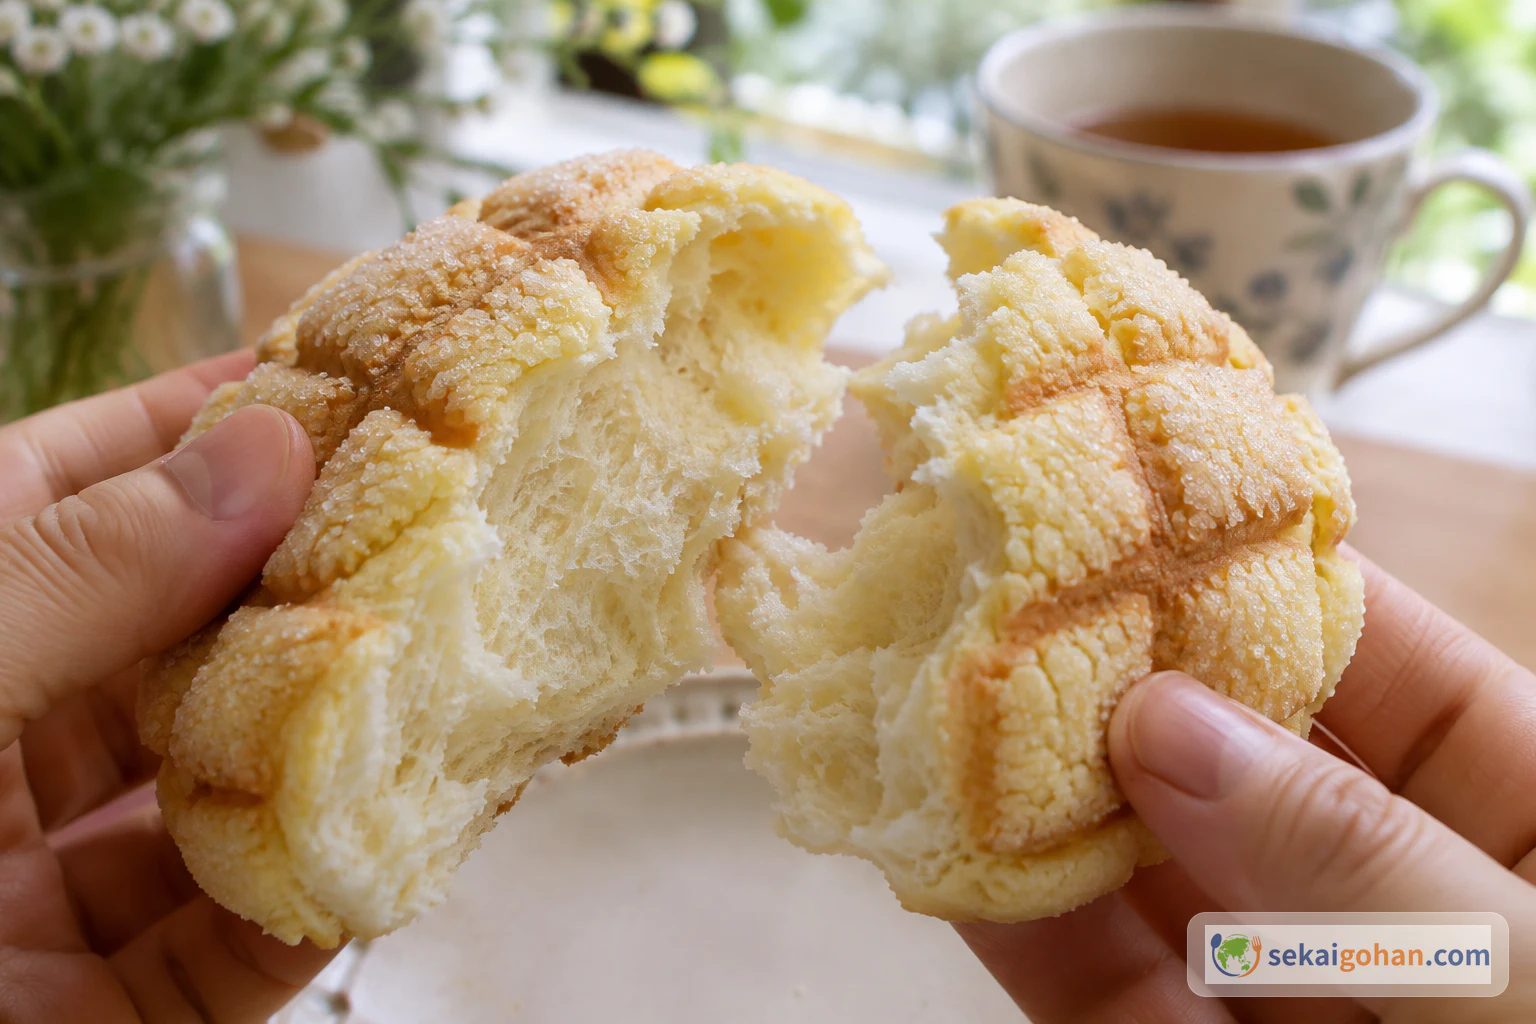
A melon pan torn open by hand, showing the crisp biscuit layer outside and the soft bread inside
Torn by hand, a good bun shows a thin shell and an airy white crumb with no gap between them

At the table

Melon pan is eaten out of hand, torn rather than sliced, so the shell breaks along its grid and you get crisp crust and soft bread in the same bite. Serve it once it has cooled on the rack, while the crust is at its crispest.

Variations

These are our own suggestions and have not been tested; no amounts are given.

  • Chocolate chip crust: fold chocolate chips into the biscuit dough after the flour. They add bitter-sweet pockets to the shell, and the crust rolls out a little bumpier.
  • Matcha crust: replace part of the crust's cake flour with matcha. It turns the shell green and gives it a light bitterness against the sugar. Watch the color closely, because browning is harder to read on a green crust.
  • Lemon crust: grate lemon zest into the creamed butter and sugar. It brightens the crust without changing how it handles.
  • White bean paste center: wrap a spoonful of white bean paste inside each piece of bread dough. This brings in the filling of the almond-shaped Kansai bun while keeping the round grid shape.
  • Smaller buns: divide each dough into 16 instead of 10. Smaller buns color sooner, so check them before the usual bake time is up.

Storage

Let the buns cool completely, then wrap each one in plastic wrap and put them in an airtight container or bag. Keep them in the refrigerator for up to 3 days, or freeze them for up to 1 month. Thaw frozen buns overnight in the refrigerator or in the microwave, then warm them in a 350°F (180°C) oven until the crust is crisp again.

Frequently Asked Questions

Is there any melon in melon pan?

No. The basic bun is flavored only by butter, sugar and egg. Some versions add melon liqueur to the dough, and one explanation of the name holds that melon essence once flavored the crust. The round, grid-scored bun is usually plain.

Are the small cracks across the top a mistake?

No. Fine cracks between the grid lines are part of how the crust should look. They open as the bread swells underneath the crust. Only wide splits that run across the grid point to a problem with scoring depth or a dried-out crust.

Do I need a melon pan grid stamp?

No. A bench scraper scores the grid perfectly well. A stamp presses every line at the same depth and spacing in a single motion, which helps if you bake melon pan often. With a scraper, press each line straight down and keep the gaps even.
Sources

  • Just One Cookbook (Namiko Hirasawa Chen), "Melon Pan (Meronpan)." Ingredients and amounts for 10 buns, method, proofing times and temperatures, baking temperature and time, storage and reheating, and explanations of the name. https://www.justonecookbook.com/melon-pan/
  • Kobe Shimbun (Masayuki Suzuki), "メロンパン 神戸ではなぜ「サンライズ」?" (Melon pan: why is it "sunrise" in Kobe?), October 2016. The sunrise name in Kobe, Kinseido and its Sunrice spelling, the Kure origin story and the rising-sun flag, its spread across Kansai, and the almond-shaped white-bean melon pan of 1952. https://www.kobe-np.co.jp/news/backnumber/201610/0011888207.shtml
  • Shogakukan HugKum, "神戸でメロンパンは「サンライズ」と呼ぶって知ってた? 神戸のメロンパン事情を整理してみた" (Did you know Kobe calls melon pan "sunrise"?), September 2024. Sunrise and round melon pan as the same bun, the almond-shaped melon pan in parts of Kansai and Hiroshima, koppepan in Mihara and Kure, explanations of the name, and why the grid makes the crust crack evenly. https://hugkum.sho.jp/642165
  • Toshiba Lifestyle, "メロンパン(石窯ドーム オリジナルレシピ)" (Melon pan, Ishigama Dome original recipe). Cross-check for rolling the crust to about 10 cm, wrapping the dough, sugaring and scoring the grid, and covering the buns during proofing. https://www.toshiba-lifestyle.com/jp/microwaves/recipes/detail/808/